If you have ever logged into an app using Google or any other account without creating a new password, you have already used OpenID Connect.
Now imagine bringing that same smooth login experience into Salesforce. That’s exactly what OpenID Connect (OIDC) helps you do.
In this blog, I’ll walk you through everything in a very simple and practical way. No heavy jargon, no confusion. Just clear understanding with real-world relevance.
What Exactly is OpenID Connect?
Let’s not complicate it.
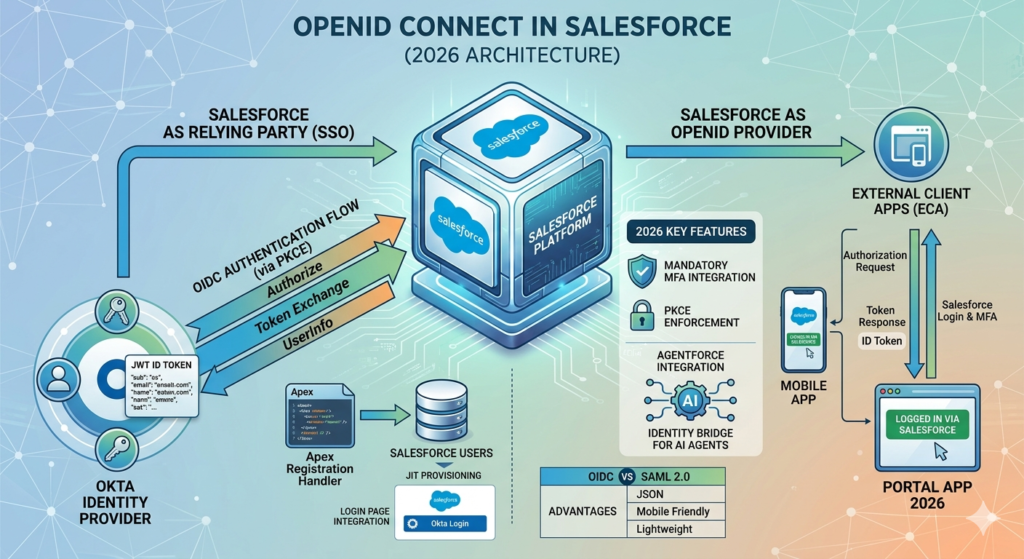
OpenID Connect is a way to let users log in to one system using another system’s credentials.
Example:
Instead of creating a new username and password in Salesforce, a user can log in using Google, Okta, or any identity provider.
It is built on top of OAuth 2.0, but while OAuth focuses on authorization, OpenID Connect focuses on authentication.
Why Should You Care About OIDC in Salesforce?
Because user experience matters.
And security matters even more.
Here’s what you get:
- No need to manage multiple passwords
- One-click login experience
- Secure authentication using trusted providers
- Easy integration with external systems
- Less hassle for both users and admins
If you are working on Experience Cloud, integrations, or enterprise apps, this becomes extremely useful.
Let’s Understand the Flow (In Plain English)
Here’s how things actually happen behind the scenes:
- User clicks login in Salesforce
- Salesforce redirects the user to an Identity Provider
- User logs in there
- Identity Provider sends a code back to Salesforce
- Salesforce verifies it and logs the user in
That’s it. Clean and secure.
Key Terms You Should Know
Before jumping into setup, just get comfortable with these:
- Identity Provider (IdP): System that verifies user identity (Google, Okta)
- Service Provider: Salesforce
- Client ID & Secret: Credentials connecting both systems
- Endpoints: URLs used for authentication and token exchange
You don’t need to memorize them. Just understand the purpose.
Step-by-Step: How to Configure OpenID Connect in Salesforce
Now comes the practical part.
Step 1: Create a Connected App
Go to Setup in Salesforce:
- Search for App Manager
- Click on New Connected App
Fill basic details and then:
- Enable OAuth settings
- Add a Callback URL
- Select scopes like OpenID, Email, Profile
Once saved, you’ll get:
- Client ID
- Client Secret
Keep them safe.
Step 2: Set Up Identity Provider
Go to your Identity Provider (Google, Okta, etc.):
- Create a new application
- Add Salesforce callback URL
- Copy Client ID and Secret
- Note down endpoints
This is where authentication actually happens.
Step 3: Create Auth Provider in Salesforce
Now back to Salesforce:
- Go to Auth Providers
- Click New
- Select OpenID Connect
Fill in:
- Consumer Key
- Consumer Secret
- Authorization URL
- Token URL
- User Info URL
Save it.
Step 4: (Optional but Smart) Use Named Credentials
Named Credentials make your life easier.
- Go to Named Credentials
- Create new
- Select OpenID Connect
- Link with Auth Provider
This helps manage authentication securely without writing extra code.
Step 5: Enable in My Domain
- Go to My Domain
- Deploy it (if not already)
- Enable Authentication Services
- Select your OIDC provider
Step 6: Test the Login
Now the fun part.
- Open Salesforce login page
- You’ll see a new login option
- Click it
- Login via Identity Provider
And just like that, you are inside Salesforce.
Where is This Used in Real Life?
This is not just theory. It is used everywhere:
- Customer portals
- Partner portals
- Internal employee login systems
- Mobile app authentication
- Third-party integrations
If you are building anything serious on Salesforce, you will need this.
Some Practical Tips (From Experience)
- Always double-check your callback URL
- Use HTTPS only
- Don’t give unnecessary permissions
- Enable MFA wherever possible
- Test in sandbox before production
Common Mistakes to Avoid
- Mismatched redirect URLs
- Wrong endpoints
- Incorrect client credentials
- Not enabling My Domain
These small mistakes can waste a lot of time.
Final Thoughts
OpenID Connect in Salesforce is not just a feature. It’s a necessity in modern applications.
It makes login smoother, systems more secure, and users happier.
If you are a Salesforce developer or admin, this is something you should definitely have in your toolkit.
Start small, experiment, break things, fix them, and you’ll get comfortable with it very quickly.