Salesforce automation has become much more powerful over the years. One of the most exciting features introduced in Flow Builder is the ability to perform HTTP Callouts without writing Apex code.
If you’re a Salesforce beginner, don’t worry. In this blog, we’ll understand what callouts are, why they are useful, and how you can configure them directly in Flow Builder.
What is a Callout in Salesforce?
A callout is a request sent from Salesforce to an external system or application.
Think of it like this:
Imagine a customer fills out a form in Salesforce, and you want to automatically fetch additional information from another application, such as a payment system, weather service, or shipping provider. Salesforce sends a request to that external application and receives a response back. This communication is called a callout.
Real-Life Examples
You can use callouts to:
- Check delivery status from a shipping company
- Verify customer details from a third-party service
- Get current weather information
- Fetch exchange rates
- Connect Salesforce with external applications
Earlier, developers had to write Apex code for these integrations. Now, Flow Builder allows admins and developers to create simple integrations with much less coding.
Why Use HTTP Callouts in Flow Builder?
Here are some benefits:
No Apex Required
You can create integrations using clicks instead of code.
Faster Development
Flows can be built and deployed quickly.
Easy Maintenance
Admins can update flows without modifying Apex classes.
Better Automation
Data can be fetched from external systems in real time.
Prerequisites
Before creating a callout, make sure you have:
- Salesforce Flow Builder access
- API details of the external service
- Endpoint URL
- Authentication details (if required)
- Required permissions
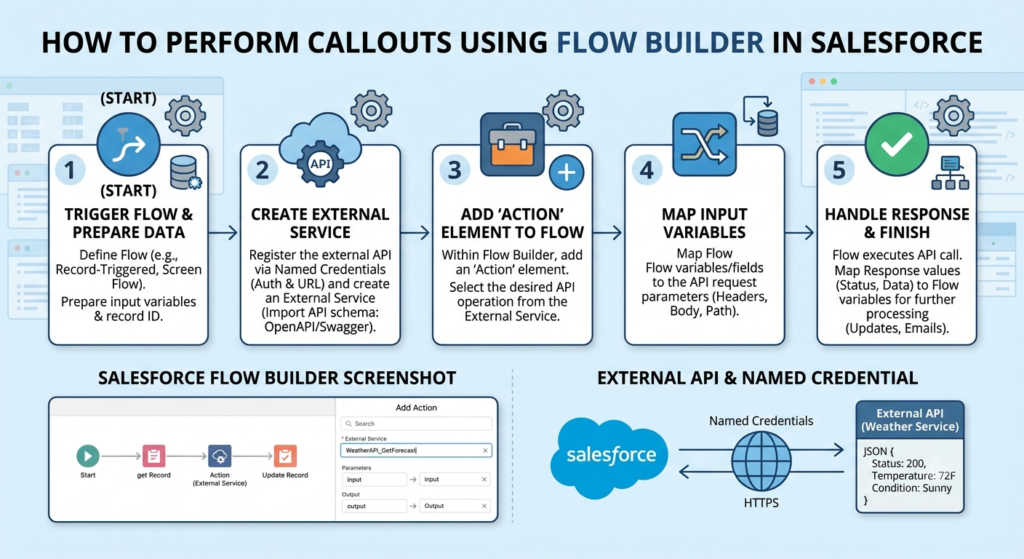
Step 1: Create a Named Credential
A Named Credential stores authentication and endpoint information securely.
To create it:
- Go to Setup
- Search for Named Credentials
- Click New
- Enter:
- Label
- Name
- URL of the external service
- Configure authentication if needed
- Save
Using Named Credentials is considered a best practice because it keeps sensitive information secure.
Step 2: Create an External Service Callout
Now let’s configure the HTTP Callout.
Steps:
- Go to Setup
- Search for HTTP Callout
- Click New HTTP Callout
You will need to provide:
- Named Credential
- API Endpoint
- HTTP Method
Common HTTP methods include:
- GET – Retrieve data
- POST – Create data
- PUT – Update data
- DELETE – Remove data
For beginners, GET requests are the easiest place to start.
Step 3: Define Request and Response
Salesforce needs to understand the data being sent and received.
For example:
Request
{
  "customerId": "12345"
}
Response
{
  "name": "John Doe",
  "city": "New York",
  "status": "Active"
}
Salesforce automatically generates fields based on the sample response.
This makes it easier to use the returned data inside your flow.
Step 4: Create a Flow
Now it’s time to use the callout.
Steps:
- Open Flow Builder
- Click New Flow
- Select the flow type
- Add required elements
You can choose:
- Record-Triggered Flow
- Screen Flow
- Scheduled Flow
- Autolaunched Flow
For this example, we’ll use a Record-Triggered Flow.
Step 5: Add the Callout Action
Inside the flow:
- Click the “+” icon
- Select Action
- Search for your HTTP Callout action
- Select it
- Pass the required input values
Salesforce will automatically display the fields generated during callout configuration.
Step 6: Use the Response Data
Once the callout executes, you can use the returned data anywhere in the flow.
For example:
- Update Salesforce records
- Display information on a screen
- Send emails
- Create tasks
- Trigger additional business processes
This allows Salesforce to react instantly based on information from external systems.
Example Scenario
Let’s say a customer record is created in Salesforce.
Flow Process
- Customer record gets created
- Flow triggers automatically
- HTTP Callout sends customer ID to an external system
- External system returns customer status
- Flow updates the customer record with the latest status
Everything happens automatically without any manual effort.
Best Practices
Here are some tips when working with Flow Callouts:
Use Named Credentials
Never hardcode URLs or credentials.
Handle Errors
Always create fault paths in your flow.
Test Thoroughly
Verify responses before moving to production.
Keep Flows Simple
Avoid adding too much logic in a single flow.
Monitor API Limits
External services may have request limits.
Common Challenges
Authentication Errors
Check credentials and permissions.
Invalid Response Format
Make sure the API returns the expected JSON structure.
Timeout Issues
External systems should respond quickly.
Missing Data
Verify request parameters are being passed correctly.
Final Thoughts
HTTP Callouts in Flow Builder have made Salesforce integrations much easier than before. Instead of writing Apex code for every external connection, admins and developers can now build powerful integrations using a low-code approach.
If you’re new to Salesforce, start with simple GET callouts and gradually explore more advanced scenarios like POST requests, authentication methods, and complex API integrations.