In any business, the journey from finding a potential customer to converting them into a paying client is very important. This journey is known as the Pre-Sales Life Cycle.
In Salesforce, this process is well-structured and helps businesses manage leads, track opportunities, and improve conversions.
If you are preparing for interviews, working as a Salesforce Admin, or just starting your CRM journey, understanding the Pre-Sales Life Cycle is a must.
In this guide, we will explain everything step by step in simple English so that you can understand and apply it in real projects.
What is Pre-Sales Life Cycle in Salesforce
The Pre-Sales Life Cycle refers to all the steps involved before a deal is closed.
It starts from identifying a potential customer and ends when the deal is ready to be converted into a sale.
In Salesforce, this process is managed using:
- Leads
- Accounts
- Contacts
- Opportunities
Why Pre-Sales Process is Important
A well-defined pre-sales process helps businesses:
- Track potential customers
- Improve conversion rates
- Organize sales activities
- Build strong relationships
- Make better business decisions
In simple words, it ensures that no opportunity is missed.
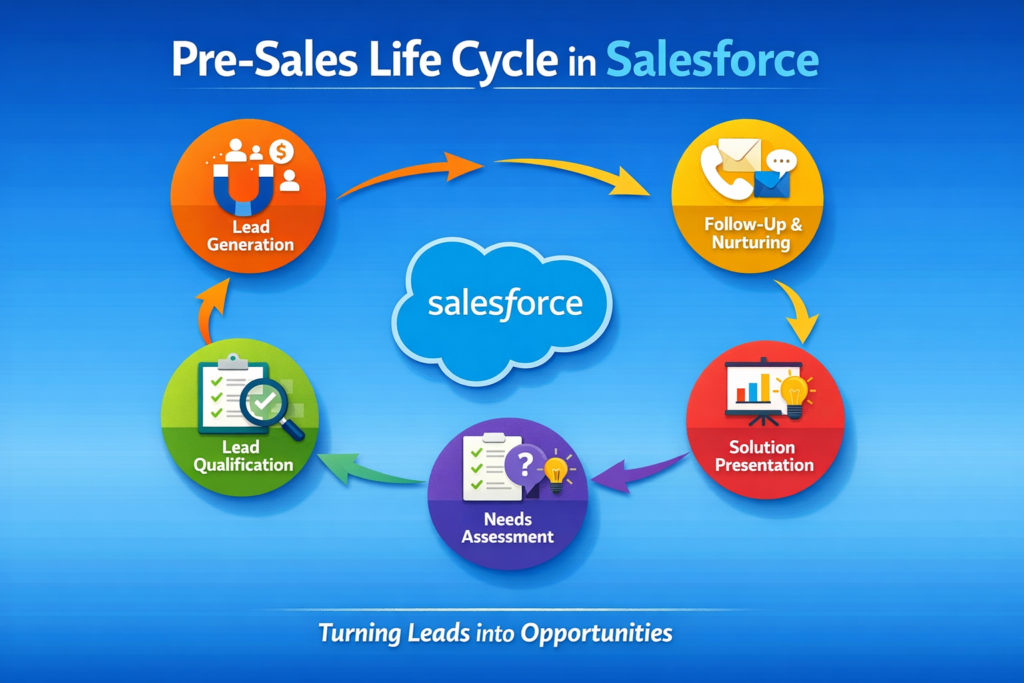
Stages of Pre-Sales Life Cycle in Salesforce
Let’s understand each stage step by step.
1. Lead Generation
This is the first stage.
Leads are potential customers who have shown interest in your product or service.
Sources of Leads:
- Website forms
- Social media
- Campaigns
- Events
Example:
A user fills out a form on your website. This becomes a lead in Salesforce.
2. Lead Capture in Salesforce
Once leads are generated, they are captured in Salesforce.
Methods:
- Manual entry
- Web-to-Lead
- Data import
Important Fields:
- Name
- Company
- Source
3. Lead Qualification
Not all leads are useful. So the next step is to qualify them.
Criteria:
- Budget
- Need
- Timeline
- Interest
Outcome:
- Qualified Lead
- Disqualified Lead
4. Lead Assignment
Qualified leads are assigned to sales representatives.
Methods:
- Manual assignment
- Assignment rules
This ensures the right person handles the lead.
5. Lead Nurturing
Sometimes leads are not ready to buy immediately.
Activities:
- Follow-up emails
- Calls
- Sharing information
Goal:
Build trust and move the lead forward.
6. Lead Conversion
When a lead is ready, it is converted.
Conversion creates:
- Account (Company)
- Contact (Person)
- Opportunity (Deal)
This is a key step in Salesforce.
7. Opportunity Creation
After conversion, an opportunity is created.
Opportunity includes:
- Deal value
- Stage
- Close date
8. Opportunity Management
Now the sales team works on closing the deal.
Stages may include:
- Prospecting
- Proposal
- Negotiation
9. Pre-Sales Activities
Before closing, several activities happen:
- Product demos
- Requirement gathering
- Solution design
- Pricing discussions
These activities help convince the customer.
10. Ready for Closure
At this stage:
- Customer agrees
- Terms are finalized
- Deal is ready to close
Step-by-Step Flow Summary
Here is the complete flow:
- Lead is generated
- Lead is captured in Salesforce
- Lead is qualified
- Lead is assigned
- Lead is nurtured
- Lead is converted
- Opportunity is created
- Opportunity is managed
- Pre-sales activities are performed
- Deal is ready for closure
Real-Life Scenario
Let’s understand with a simple example.
A company runs a marketing campaign.
- User fills a form → Lead created
- Sales team checks details → Lead qualified
- Lead assigned to sales rep
- Sales rep calls and shares product info
- Lead shows interest → Converted
- Opportunity created
- Demo and pricing discussed
- Deal moves to final stage
Salesforce Features Used in Pre-Sales
Salesforce provides many tools to manage this process:
- Leads and Lead Assignment Rules
- Accounts and Contacts
- Opportunities
- Campaigns
- Reports and Dashboards
Best Practices for Pre-Sales Life Cycle
To improve efficiency:
- Always keep data clean
- Use automation wherever possible
- Track every interaction
- Follow up regularly
- Use reports to analyze performance
Common Challenges and Solutions
Challenge 1: Poor Lead Quality
Solution: Use better qualification criteria
Challenge 2: Missed Follow-ups
Solution: Use reminders and automation
Challenge 3: Data Duplication
Solution: Use duplicate rules
Challenge 4: Lack of Visibility
Solution: Use dashboards and reports
Final Thoughts
The Pre-Sales Life Cycle in Salesforce is the foundation of a successful sales process. It helps businesses manage leads effectively and convert them into customers.
If you understand and implement this process properly, you can:
- Improve sales performance
- Increase conversions
- Build better customer relationships
Whether you are an Admin, Developer, or Consultant, mastering this lifecycle will give you a strong advantage in your Salesforce career.