In today’s digital world, printing, signing, scanning, and emailing documents feels outdated. Whether you are sending an offer letter, agreement, NDA, freelance contract, or client proposal, eSignature makes the entire process faster and more professional.
If you are sending your first document for eSignature and feeling unsure about the process, this detailed step-by-step guide will help you understand everything in simple English.
What is an eSignature?
An eSignature (Electronic Signature) is a digital way to sign documents online. Instead of printing and signing by hand, you sign electronically using your mouse, mobile device, or by typing your signature.
Some popular eSignature platforms include:
-
DocuSign
-
Adobe Sign
-
HelloSign
-
Zoho Sign
These tools are secure, widely accepted, and legally valid in many countries.
Why Should You Use eSignature?
Before learning the steps, let’s understand why eSignature is important:
-
Saves time
-
Eliminates printing and scanning
-
Speeds up approvals
-
Looks professional
-
Keeps documents organized
-
Allows real-time tracking
If you are a freelancer, HR professional, business owner, or startup founder, eSignature can improve your workflow significantly.
Step-by-Step Guide to Send Your First Document for eSignature
Now let’s go step by step.
Step 1: Choose an eSignature Platform
The first step is selecting a platform that fits your needs. Many tools offer free trials or basic plans.
For example:
-
DocuSign is widely used and beginner-friendly.
-
Adobe Sign works well with PDF documents.
-
Zoho Sign is suitable for small businesses.
Choose based on your budget, document volume, and required features.
Step 2: Create an Account
Visit the platform’s website and sign up.
You will typically need:
-
Email address
-
Password
-
Basic details
After registration, verify your email to activate your account.
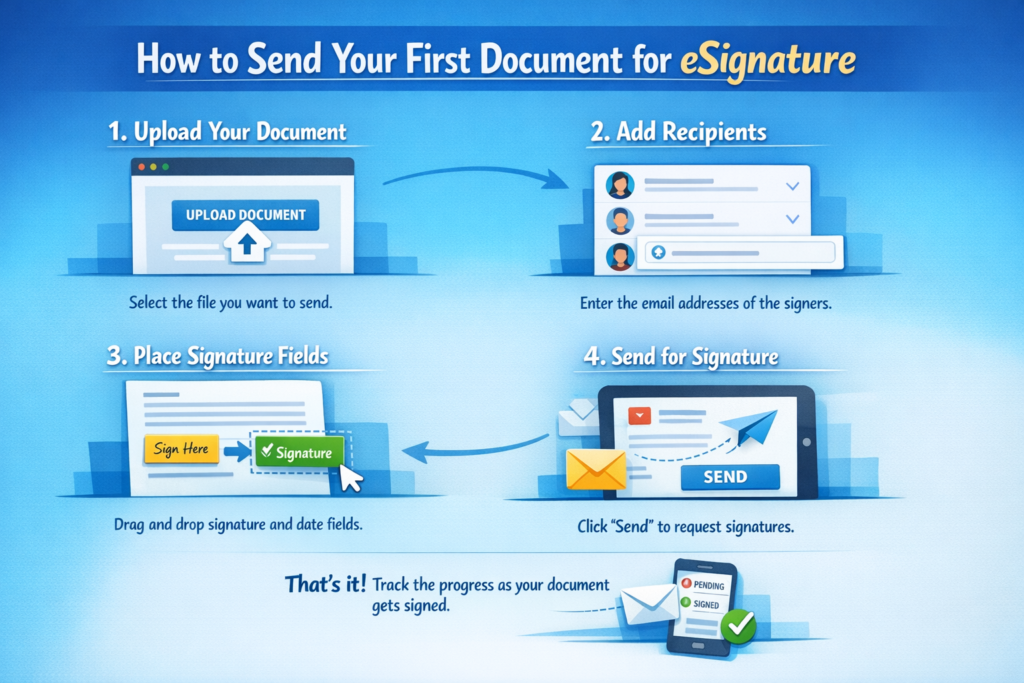
Step 3: Upload Your Document
Once logged in, click on “New Document” or “Send for Signature.”
Upload your file. Most platforms support:
-
PDF
-
Word documents
-
Image files
You can usually drag and drop the file directly into the upload area.
Step 4: Add Recipient Details
Now enter the details of the person who needs to sign the document.
Provide:
-
Full name
-
Email address
If multiple people need to sign, you can define the signing order. For example:
-
First signer
-
Second signer
-
Final approver
This ensures the document moves in the correct sequence.
Step 5: Add Signature and Other Fields
After uploading, you will see a document editor.
Here you need to:
-
Drag and place the signature field
-
Add date field
-
Add name field if required
-
Insert text boxes if needed
Place these fields exactly where the signer needs to fill in details.
Take a moment to check alignment and placement before moving forward.
Step 6: Add a Message (Optional)
Most platforms allow you to include a short message before sending the document.
For example:
“Hi John,
Please review and sign this agreement. Let me know if you have any questions.
Thank you.”
Adding a message makes your communication clear and professional.
Step 7: Review Everything Carefully
Before clicking send, double-check:
-
Document content
-
Correct recipient email
-
Signature placement
-
Signing order
Reviewing prevents delays and errors.
Step 8: Send the Document
After confirming everything, click the “Send” button.
The recipient will receive an email with a secure link to review and sign the document.
What Happens After You Send the Document?
Here is what usually happens next:
-
The recipient opens the email.
-
Clicks on the document link.
-
Reviews the document.
-
Adds their signature.
-
Clicks “Finish” or “Complete.”
You will receive a notification once the document is signed.
Most platforms also provide:
-
Status tracking
-
Automatic reminders
-
Secure storage of signed documents
Is eSignature Legally Valid?
Yes, in many countries such as the United States, India, the United Kingdom, and European Union countries, eSignatures are legally recognized under digital transaction laws.
However, always verify local regulations for specific legal requirements, especially for high-value contracts.
Tips for First-Time Users
To ensure a smooth experience:
-
Use professional email addresses
-
Name your files clearly (Example: Employment_Agreement_2026.pdf)
-
Add expiry dates if needed
-
Enable automatic reminders
-
Keep document versions organized
These small practices improve professionalism and efficiency.
Common Mistakes to Avoid
-
Sending to the wrong email address
-
Forgetting to add signature fields
-
Uploading the wrong document version
-
Skipping final review
-
Not setting signing order properly
Avoiding these mistakes will save time and prevent confusion.
Why Businesses Prefer eSignature
Today, businesses of all sizes use eSignature because it helps with:
-
Faster hiring processes
-
Quick contract approvals
-
Remote work management
-
Client onboarding
-
Paperless operations
It reduces operational costs and increases productivity.
Final Thoughts
Sending your first document for eSignature may seem technical at first, but the process is simple once you understand the steps.
To summarize:
-
Choose a platform
-
Upload the document
-
Add recipient details
-
Insert signature fields
-
Review carefully
-
Send
A really good blog and me back again.