If you are working with Lightning Web Components, one concept that you must understand clearly is Data Binding. It is the foundation of how your UI and data stay in sync.
Many developers learn LWC syntax, but the real power comes when you understand how data flows between components and how UI updates automatically.
In this detailed guide, we will break down LWC Data Binding step by step in simple English, with real examples and best practices that you can use in real projects.
What is Data Binding in LWC
Data binding is a way to connect your JavaScript data (model) with your HTML template (view).
In simple words:
- When data changes → UI updates automatically
- When user interacts → data can also update
This creates a smooth and dynamic user experience.
LWC follows a reactive programming model, which means the UI reacts automatically when data changes.
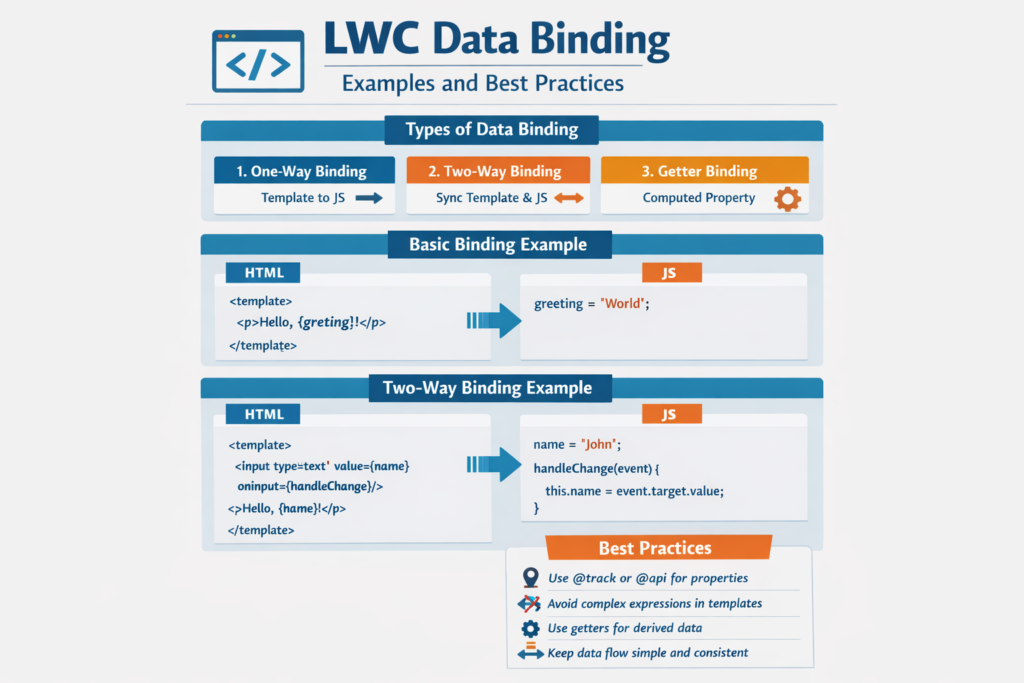
Types of Data Binding in LWC
There are mainly three types you should understand:
- One-Way Data Binding
- Two-Way Data Binding (via events)
- Data Binding with Expressions and Conditions
Let’s understand each one step by step.
1. One-Way Data Binding (Parent to Child)
One-way binding means data flows in one direction only.
From:
Parent → Child
This is also called “data down”.
How it Works
- Parent sends data using attributes
- Child receives data using @api
Example
Parent Component
<c-child-component message={greeting}></c-child-component>
</template>
export default class ParentComponent extends LightningElement {
greeting = ‘Hello, World!’;
}
Child Component
<p>{message}</p>
</template>
export default class ChildComponent extends LightningElement {
@api message;
}
Explanation
- Parent has
greeting - It passes value to child as
message - Child displays it in UI
Simple, clean, and recommended approach.
2. Two-Way Data Binding (Child to Parent using Events)
In LWC, true two-way binding is not automatic like some other frameworks.
Instead, we achieve it using:
- Events (child → parent)
- Properties (parent → child)
This creates a controlled two-way communication.
Example
Parent Component
<c-child-component message={greeting} onmessagechange={handleMessageChange}></c-child-component>
<p>Message from child: {greeting}</p>
</template>
export default class ParentComponent extends LightningElement {
greeting = ‘Hello, World!’;
handleMessageChange(event) {
this.greeting = event.detail.value;
}
}
Child Component
<lightning-input
type=“text”
value={message}
onchange={handleChange}>
</lightning-input>
</template>
export default class ChildComponent extends LightningElement {
@api message;
handleChange(event) {
this.dispatchEvent(new CustomEvent(‘messagechange’, {
detail: { value: event.target.value }
}));
}
}
Explanation
- Child takes input from user
- Fires custom event
- Parent listens and updates value
This is how controlled two-way binding works in LWC.
3. Data Binding with Expressions
You can manipulate data directly in HTML using expressions.
Example
<p>Original: {message}</p>
<p>Uppercase: {message.toUpperCase()}</p>
<p>Length: {message.length}</p>
</template>
export default class MyComponent extends LightningElement {
message = ‘Hello World’;
}
Explanation
- No need to create extra variables
- You can directly transform data
4. Conditional Rendering with Data Binding
LWC allows you to show or hide UI based on conditions.
Example
<lightning-input
type=“text”
value={message}
onchange={handleChange}>
</lightning-input>
<template if:true={message}>
<p>You entered: {message}</p>
</template>
<template if:false={message}>
<p>Please enter a message</p>
</template>
</template>
export default class MyComponent extends LightningElement {
message = ”;
handleChange(event) {
this.message = event.target.value;
}
}
Explanation
- If message exists → show text
- If empty → show prompt
This improves user experience.
Best Practices for LWC Data Binding
Now let’s understand how to use data binding in a professional way.
1. Use @track Carefully
Earlier, @track was required for reactivity.
Now:
- Most properties are reactive by default
- Use @track only when needed
2. Follow Immutable Data Updates
Instead of modifying data directly, create new copies.
Example
Why this matters
- Improves performance
- Helps LWC detect changes easily
3. Avoid Unnecessary Re-Renders
Too many updates can slow your UI.
Tips:
- Break components into smaller parts
- Update only required data
4. Avoid Deeply Nested Objects
Complex objects make binding difficult.
Bad:
Better:
- Flatten structure
- Keep data simple
5. Use Getter Functions
Use getters for computed values.
Example
return `${this.firstName} ${this.lastName}`;
}
Benefits:
- Cleaner code
- Better readability
- Dynamic calculation
6. Optimize Data Passing
Do not pass large objects unnecessarily.
Instead:
- Pass only required fields
- Use events wisely
7. Use @wire Efficiently
@wire helps in:
- Fetching data
- Caching results
This reduces API calls and improves performance.
8. Handle Events Properly
Always:
- Use meaningful event names
- Remove listeners when not needed
This avoids memory issues.
Real-Life Scenario
Let’s understand with a simple use case.
You are building a Contact Form.
Using data binding:
- Input fields capture user data
- UI updates instantly
- Parent component stores data
- Form submission triggers event
This creates a smooth and responsive experience.
Common Mistakes to Avoid
- Overusing @track
- Mutating objects directly
- Passing large data unnecessarily
- Ignoring performance
- Writing logic inside HTML
Avoid these mistakes to write clean and efficient code.
Final Thoughts
LWC Data Binding is one of the most important concepts in Salesforce frontend development. Once you understand how data flows between components, your development becomes faster and more structured.
If you apply these best practices:
- Your components will be faster
- Your code will be cleaner
- Your applications will be more scalable
Start practicing these concepts in small projects, and gradually you will become confident in building dynamic and high-performing Lightning Web Components.