How to Simplify Data Migration in Salesforce: A Complete Step-by-Step Guide
Data migration is one of the most critical—and often the most challenging—parts of any Salesforce implementation. Whether you’re moving from a legacy CRM, integrating data from multiple systems, or consolidating orgs, the migration process can quickly become complex. Poor planning or execution can lead to data loss, inconsistencies, or costly rework.
But with the right approach, tools, and strategy, Salesforce data migration can be made smooth, predictable, and error-free.
In this blog, we’ll break down how to simplify data migration in Salesforce, covering best practices, tools, steps, common pitfalls, and pro-level tips.
What is Data Migration in Salesforce?
Data migration in Salesforce refers to the process of extracting, transforming, and loading (ETL) data from a source system into Salesforce. This may include:
-
Accounts, Contacts, Leads
-
Opportunities & Products
-
Custom object data
-
Files & Attachments
-
Metadata (optional)
Successful migration ensures your business starts with clean, accurate, and usable data inside Salesforce.
Why Data Migration Becomes Complicated
Migrating data to Salesforce is tricky because:
-
Salesforce has strict data relationships (lookup & master-detail).
-
Validation rules, triggers, and flows may block inserts.
-
Duplicate data often exists across old systems.
-
Large volumes require proper sequencing.
-
Picklists & record types must match Salesforce configuration.
-
Attachments and notes require special handling.
Simplifying the migration means addressing these challenges early.
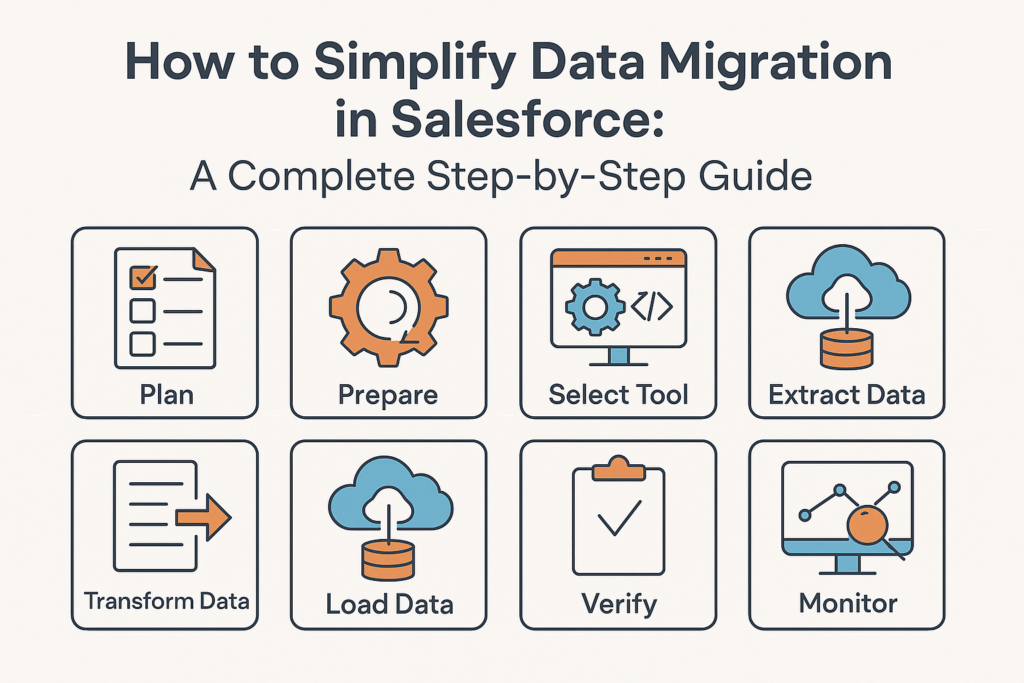
Step-by-Step Guide: How to Simplify Salesforce Data Migration
1️⃣ Start with a Clear Migration Strategy
Before touching the data, define:
✔ What data needs to be migrated
✔ Which objects are in scope
✔ Data volume (small, medium, or millions of records)
✔ Quality issues & cleanup needs
✔ Dependencies between objects
✔ Deadlines and milestones
A proper strategy avoids confusion during execution.
2️⃣ Audit and Clean Your Source Data
This step is the foundation of a smooth migration.
Perform:
-
Duplicate removal
-
Field value standardization
-
Fixing incomplete or invalid records
-
Ensuring mandatory fields exist
🔍 Pro Tip: Data cleanup is much easier in the source system than fixing errors after migration.
3️⃣ Understand Salesforce Object Relationships
Salesforce stores relational data. For example:
-
Contacts → Accounts
-
Opportunities → Accounts
-
Cases → Contact & Account
This means you must load data in a sequence:
-
Load Parent objects
-
Get their Salesforce IDs
-
Replace old IDs with new Salesforce IDs
-
Load Child objects
Simplifying tip: create a mapping sheet with all master-detail and lookup dependencies.
4️⃣ Use a Data Mapping Template
Create a clear mapping of:
-
Source fields → Salesforce fields
-
Data types
-
Required fields
-
Picklist value mapping
-
Default values
A good mapping sheet reduces 80% of migration errors.
5️⃣ Choose the Right Tools for Migration
Salesforce provides multiple tools. Use them wisely:
✔ Data Loader
-
Best for large volumes
-
Ideal for inserts, updates, upserts
-
Supports bulk API
✔ Data Import Wizard
-
User-friendly
-
Best for small datasets (<50,000 records)
✔ Data Loader.io (MuleSoft)
-
Cloud-based
-
Flexible scheduling and automation
✔ External ETL Tools (Talend, Jitterbit, Informatica)
-
Required for complex transformations
-
Good for real-time or recurring migration
✔ Bulk API / Async API
-
Use for massive datasets to avoid timeout errors
Choose based on data volume and complexity.
6️⃣ Disable Automation During Migration
Salesforce automations can break your migration.
Temporarily disable:
-
Validation rules
-
Flows
-
Triggers
-
Duplicate rules
-
Assignment rules
-
Workflow rules
🏷 Tip: Use a migration flag field to bypass logic when needed.
7️⃣ Perform a Test Migration (UAT)
Never migrate directly to Production.
Do at least two rounds of test migration in a Sandbox:
-
Initial test migration
-
UAT migration
-
Production migration
Validate:
-
Record count accuracy
-
Lookup relationships
-
Picklist mappings
-
Reports & dashboards results
Document all issues and resolutions.
8️⃣ Use “External IDs” for Smooth Relationship Mapping
External IDs help maintain relationships between parent-child objects.
Example:
-
Assign
LegacyID__cin Accounts -
Load Accounts → Extract their Salesforce IDs
-
Replace Contact’s legacy IDs with Salesforce IDs
This avoids manual lookup matching.
9️⃣ Migrate Files & Attachments Separately
Files require special attention:
-
Classic Notes & Attachments → use Data Loader
-
Lightning Files → use API-based tools
-
Map ParentId correctly
Large files may need chunking.
🔟 Validate & Reconcile Data Post-Migration
After production migration:
✔ Compare record counts
✔ Run duplicate scans
✔ Cross-check key reports
✔ Validate lookups & parent-child relationships
✔ Re-enable automation
Conduct business user sign-off.
🔥 Bonus Tips to Simplify Salesforce Data Migration
✔ Automate ETL where possible
Especially for recurring imports.
✔ Use a “Migration Runbook”
Document every step for reliability.
✔ Keep stakeholders aligned
Regular updates reduce confusion.
✔ Always take backups
Maintain rollback options.
✔ Use VLOOKUP heavily
Especially for ID mapping.
⚠️ Common Mistakes to Avoid
-
Migrating without data cleanup
-
Ignoring object dependency order
-
Forgetting to disable validation rules
-
Incorrect mapping of picklist values
-
Loading directly into production
-
Not testing with enough sample data
Avoiding these saves time and rework.
📣 Final Thoughts
Data migration in Salesforce doesn’t have to be stressful. With the right planning, tools, and strategy, you can make the migration process smooth, predictable, and error-free.
By using proper mapping, doing thorough testing, and following a structured approach, you ensure your organization starts on Salesforce with clean and reliable data.