Understanding Event Phases in Lightning Web Components (LWC)
Lightning Web Components (LWC) offer a powerful event system based on the standard DOM model. Understanding how events propagate—through bubbling and capturing—is critical for building modular, maintainable components.
In this blog, you’ll learn:
- What are bubbling and capture phases?
- How custom events work in LWC
- How Shadow DOM affects event propagation
- How to implement event communication across nested components
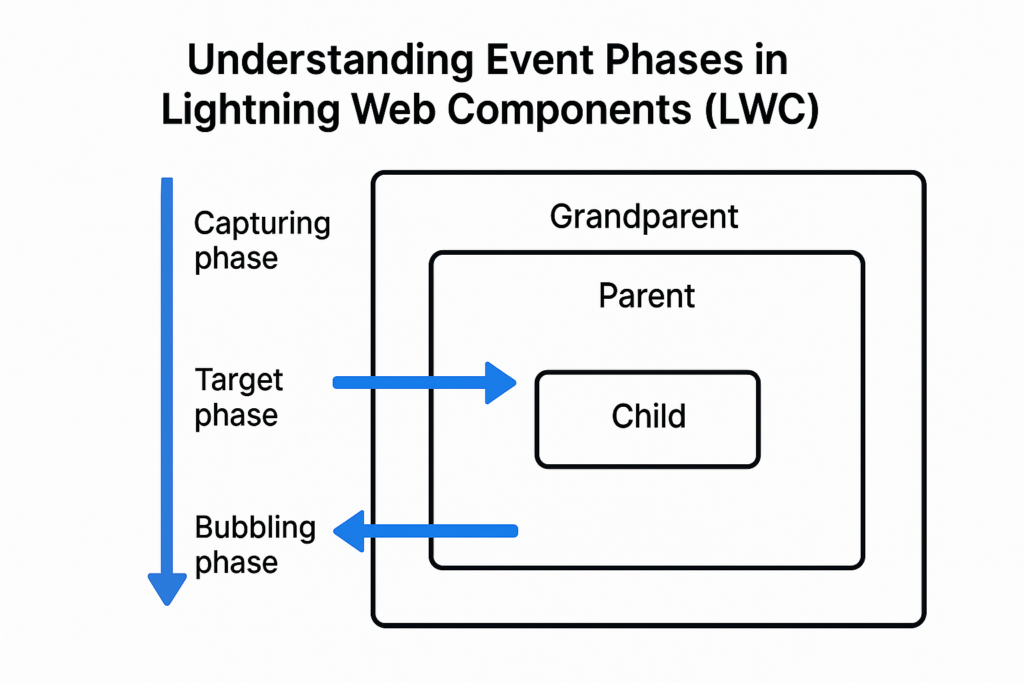
Event Propagation: Bubble vs Capture
When an event is dispatched in LWC, it goes through the following phases:
| Phase | Direction | Description |
| Capture | Top → Down | Rarely used in LWC, but possible with JavaScript listeners |
| Target | Event is handled on the element that triggered it | |
| Bubble | Bottom → Up | Most commonly used in LWC, ideal for child-to-parent communication |
Shadow DOM: The Encapsulation Layer
Each LWC component has its own Shadow DOM, which:
- Creates a boundary that isolates its DOM from the outside.
- Prevents styles and events from leaking across components unless explicitly allowed.
Key terms:
- Shadow Root: Top node of the shadow DOM
- Shadow Boundary: Interface between shadow DOM and Light DOM
To allow events to cross this boundary, you must set the composed: true flag on custom events.
Creating Custom Events in LWC
js
const myEvent = new CustomEvent(‘eventname’, {
bubbles: true,
composed: true,
detail: { myData: ‘Hello’ }
});
this.dispatchEvent(myEvent);
| Property | Default | Meaning |
| bubbles | false | Enables event to bubble up through the DOM |
| composed | false | Allows event to cross shadow DOM boundary |
Use Case: Child → Parent → Grandparent Communication
We’ll build three components:
- childComponent
- parentComponent
- grandParentComponent
Case 1: { bubbles: true, composed: true }
🔹 childComponent.js
js
handleClick() {
const selectEvent = new CustomEvent(‘buttonclick’, {
bubbles: true,
composed: true,
detail: ‘This is from Child’
});
this.dispatchEvent(selectEvent);
}
🔹 grandParentComponent.html
html
CopyEdit
<c-parent-component onbuttonclick={handleButtonClick}></c-parent-component>
🔹 grandParentComponent.js
js
CopyEdit
handleButtonClick(event) {
this.messageFromChild = event.detail;
}
Result: Event travels from child → parent → grandparent and updates messageFromChild.
Case 2: { bubbles: true, composed: false }
- Event bubbles, but does not cross the Shadow DOM.
- Grandparent won’t receive the event.
Use this when event propagation should stop at the parent level.
Case 3: { bubbles: false, composed: false }
- Default behavior.
- No bubbling and no Shadow DOM crossing.
- Useful for fully isolated events, but not recommended for inter-component communication.
Capture Phase in LWC (Top → Bottom)
Use addEventListener with the third parameter set to true to capture events during the capture phase.
🔹 In grandParentComponentCapturing.js:
js
CopyEdit
connectedCallback() {
this.template.addEventListener(‘buttonclick’, this.handleButtonClick.bind(this), true);
}
Result: Grandparent captures the event before it reaches the child.
This is useful for global logging, event monitoring, or conditionally blocking propagation.
Summary Table
| Scenario | Reaches Grandparent? | Use Case |
| { bubbles: true, composed: true } | ✅ Yes | Full propagation across components |
| { bubbles: true, composed: false } | ❌ No | Propagate within shadow DOM only |
| { bubbles: false, composed: false } | ❌ No | Fully isolated event |
| Capture Phase via addEventListener | ✅ Yes | Top-down monitoring |
Final Thoughts
Mastering event phases and propagation in LWC is essential for building scalable and loosely coupled Lightning apps. Whether you’re building reusable components or complex UIs, understanding how to control event flow across the DOM and Shadow DOM can make or break your architecture.