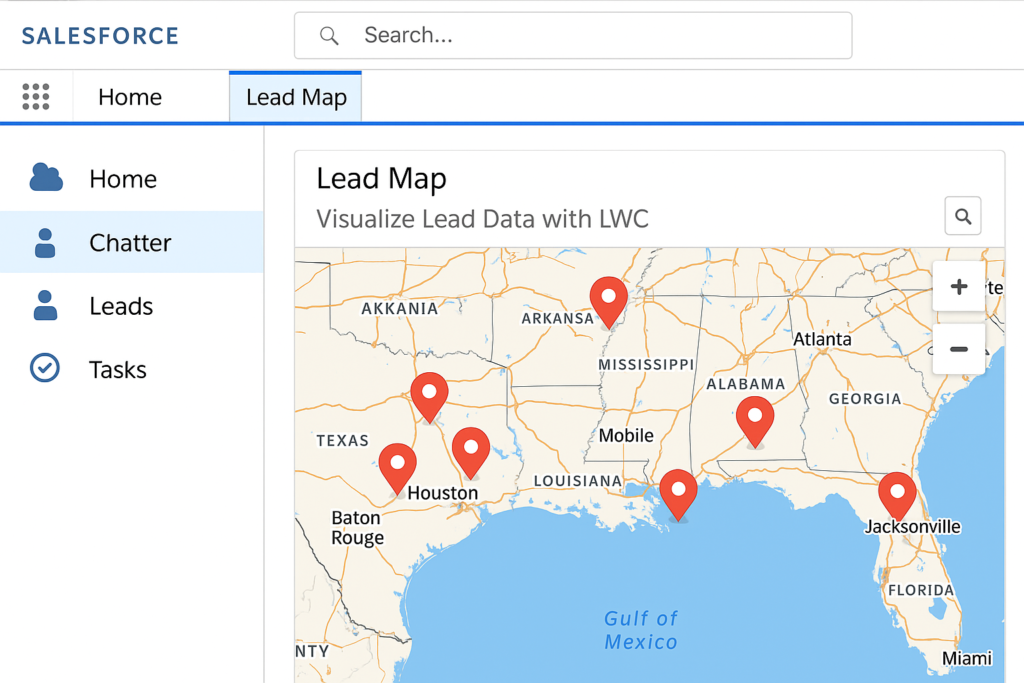
🗺️ Lightning Map Marker in Salesforce: Visualize Lead Data with LWC
In today’s data-driven CRM world, seeing your customer data on a map isn’t just a feature—it’s a strategic advantage.
With Lightning Web Components (LWC) and the powerful lightning-map base component, Salesforce developers can now create interactive, location-based visualizations right inside their apps. In this blog, we’ll walk through building a full-featured Lead Map Viewer using:
- LWC
- Apex
- Google Maps (via lightning-map)
🚀 Why Integrate Maps in Salesforce?
Integrating maps into your Lightning components enables:
- 📍 Geospatial visualization of Leads, Accounts, and more
- 🎯 Real-time address-based filtering
- 🧠 Smarter insights for sales and field reps
- 📈 Improved user experience with visual interactivity
🔧 Prerequisites
Before you begin, make sure you have:
- ✅ A Salesforce org with Lead records
- ✅ Visual Studio Code + Salesforce CLI
- ✅ Familiarity with LWC and Apex basics

🛠️ Step-by-Step Implementation
✅ Step 1: Create the Search & Map View (HTML)
In mapLeadAddress.html, layout the map, input filters, and buttons:
html
<template>
<lightning-card>
<div class=”slds-grid slds-gutters slds-m-vertical_medium” style=”padding-left: 20px;”>
<!– Map Section –>
<div class=”slds-col slds-size_8-of-12″>
<lightning-map
map-markers={mapMarkers}
alternative-text=”Map of Leads”
list-view=”hidden”
onmarkerselect={handleMarkerSelect}
selected-marker-value={selectedMarkerValue}
></lightning-map>
</div>
<!– Spinner While Loading –>
<template if:true={showSpinner}>
<lightning-spinner alternative-text=”Loading” size=”medium”></lightning-spinner>
</template>
<!– Search Form –>
<template if:false={showSpinner}>
<template if:true={showSearchForm}>
<div class=”slds-col slds-size_4-of-12 filterStyle”>
<div class=”slds-text-heading_large slds-align_absolute-center”>Map Search</div>
<lightning-input label=”Street Address” data-id=”Street”></lightning-input>
<lightning-input label=”City” data-id=”City” pattern=”^([^0-9]*)$” message-when-pattern-mismatch=”Numbers are not allowed”></lightning-input>
<lightning-input label=”Postal Code” data-id=”PostalCode”></lightning-input>
<lightning-input label=”Country” data-id=”country” pattern=”^([^0-9]*)$” message-when-pattern-mismatch=”Numbers are not allowed”></lightning-input>
<div class=”slds-align_absolute-center slds-p-vertical_medium”>
<lightning-button variant=”brand” label=”Search” onclick={handleSearchClick}></lightning-button>
<lightning-button variant=”neutral” label=”Clear” class=”slds-m-left_medium” onclick={handleClear}></lightning-button>
</div>
</div>
</template>
</template>
</div>
</lightning-card>
</template>
✅ Step 2: Handle Map Search in JavaScript
In mapLeadAddress.js:
js
import { LightningElement, api, track } from ‘lwc’;
import getLeadAddresses from ‘@salesforce/apex/mapLeadAddressController.getLeadAddresses’;
import { ShowToastEvent } from ‘lightning/platformShowToastEvent’;
export default class MapLeadAddress extends LightningElement {
@track mapMarkers = [];
tempMapMarkers = [];
showSearchForm = true;
showMulitpleMapCards = false;
showSingleMapCard = false;
searchAccountList = [];
showSpinner = false;
leadRecordId = ”;
fieldVsValue = new Map();
escapeQuotes(value) {
return value.replace(/’/g, “\\'”);
}
handleSearchClick() {
this.fieldVsValue.clear();
this.showSpinner = true;
const street = this.template.querySelector(‘[data-id=”Street”]’).value?.trim();
const city = this.template.querySelector(‘[data-id=”City”]’).value?.trim();
const zipCode = this.template.querySelector(‘[data-id=”PostalCode”]’).value?.trim();
const country = this.template.querySelector(‘[data-id=”country”]’).value?.trim();
if (street) this.fieldVsValue.set(‘Street’, `Street = ‘${this.escapeQuotes(street)}’`);
if (city) this.fieldVsValue.set(‘City’, `City = ‘${this.escapeQuotes(city)}’`);
if (zipCode) this.fieldVsValue.set(‘PostalCode’, `PostalCode = ‘${this.escapeQuotes(zipCode)}’`);
if (country) this.fieldVsValue.set(‘Country’, `Country = ‘${this.escapeQuotes(country)}’`);
if (this.fieldVsValue.size === 0) {
this.showToast(‘Error’, ‘Please enter some value’, ‘error’);
this.showSpinner = false;
return;
}
let query = ”;
let index = 0;
for (let key of this.fieldVsValue.keys()) {
query += this.fieldVsValue.get(key);
if (++index < this.fieldVsValue.size) query += ‘ AND ‘;
}
getLeadAddresses({ query })
.then(response => {
this.showSpinner = false;
if (response && response.length > 0) {
this.mapMarkers = response.map(lead => ({
location: {
Street: lead.Street,
City: lead.City,
State: lead.State,
PostalCode: lead.PostalCode,
Country: lead.Country
},
title: lead.Name,
value: lead.Id
}));
this.searchAccountList = response.map(lead => ({
…lead,
Address: `${lead.Street ?? ”} ${lead.City ?? ”} ${lead.State ?? ”} ${lead.Country ?? ”} ${lead.PostalCode ?? ”}`
}));
this.tempMapMarkers = this.mapMarkers;
this.showSearchForm = false;
this.showMulitpleMapCards = true;
this.showSingleMapCard = false;
} else {
this.showToast(‘Error’, ‘No records found’, ‘error’);
this.resetViews();
}
})
.catch(error => {
this.showToast(‘Error’, ‘Invalid Entry: ‘ + error.body?.message || error.message, ‘error’);
console.error(‘getLeadAddresses error’, error);
this.resetViews();
});
}
handleClear() {
[‘Street’, ‘City’, ‘PostalCode’, ‘country’].forEach(id => {
this.template.querySelector(`[data-id=”${id}”]`).value = ”;
});
this.fieldVsValue.clear();
}
showToast(title, message, variant) {
this.dispatchEvent(new ShowToastEvent({ title, message, variant }));
}
resetViews() {
this.showSpinner = false;
this.showSearchForm = true;
this.showMulitpleMapCards = false;
this.showSingleMapCard = false;
this.mapMarkers = [];
}
}
✅ Step 3: Apex Class to Fetch Leads
Create the Apex class mapLeadAddressController:
apex
public with sharing class mapLeadAddressController {
@AuraEnabled
public static List<Lead> getLeadAddresses(String query) {
try {
String baseQuery = ‘SELECT Id, Name, Address, Longitude, Latitude, PostalCode, City, Street, State, Country FROM Lead’;
if (!String.isBlank(query)) {
baseQuery += ‘ WHERE ‘ + query;
}
System.debug(‘Final Query: ‘ + baseQuery);
return Database.query(baseQuery);
} catch (Exception e) {
throw new AuraHandledException(‘Invalid Entry: ‘ + e.getMessage());
}
}
}
✅ Step 4: Display Lead Results with Pagination
Create a child component (mapAddressDetailCard) to display leads and handle pagination:
html
<template>
<div class=”slds-text-heading_medium slds-align_absolute-center” style=”font-weight: bold;”>Searched Results</div>
<div class=”pagination-controls slds-m-vertical_medium” style=”text-align: right;”>
<lightning-icon icon-name=”utility:chevronleft” onclick={handlePrevious} disabled={isFirstPage}></lightning-icon>
<span class=”slds-m-horizontal_x-small”>Page {currentPage} of {totalPages}</span>
<lightning-icon icon-name=”utility:chevronright” onclick={handleNext} disabled={isLastPage}></lightning-icon>
</div>
<div class=”slds-p-around_medium cardViewer”>
<template for:each={paginatedRecords} for:item=”lead”>
<article key={lead.Id} class=”slds-card”>
<div class=”slds-card__header”>{lead.Name}</div>
<div class=”slds-card__body”>{lead.Address}</div>
<div class=”slds-card__footer”>
<span onclick={handleAccountClick} data-id={lead.Id} style=”cursor: pointer;”>View Marker Details</span>
</div>
</article>
</template>
</div>
</template>
And in its JS:
js
import { LightningElement, api, track } from ‘lwc’;
export default class MapAddressDetailCard extends LightningElement {
_leadList = [];
@track paginatedRecords = [];
@track currentPage = 1;
@track pageSize = 7;
@api
get leadList() {
return this._leadList;
}
set leadList(value) {
this._leadList = value || [];
this.currentPage = 1;
this.updatePaginatedRecords();
}
get totalPages() {
return Math.ceil(this._leadList.length / this.pageSize);
}
get isFirstPage() {
return this.currentPage === 1;
}
get isLastPage() {
return this.currentPage === this.totalPages;
}
updatePaginatedRecords() {
const start = (this.currentPage – 1) * this.pageSize;
const end = start + this.pageSize;
this.paginatedRecords = this._leadList.slice(start, end);
}
handlePrevious() {
if (this.currentPage > 1) {
this.currentPage–;
this.updatePaginatedRecords();
}
}
handleNext() {
if (this.currentPage < this.totalPages) {
this.currentPage++;
this.updatePaginatedRecords();
}
}
handleAccountClick(event) {
const recordId = event.currentTarget.dataset.id;
this.dispatchEvent(new CustomEvent(‘mycustomevent’, {
detail: recordId
}));
}
}

💡 Bonus Tips
Want to make your map even more powerful?
- Show route directions between markers
- Add real-time geolocation using device GPS
- Use clustering for dense marker groups
🏁 Conclusion
You now have a working map-based lead search app in Salesforce, built using:
- lightning-map
- dynamic SOQL via Apex
- reusable LWC components
- elegant, paginated lead display
📍 Whether you’re enabling field reps, supporting local campaigns, or tracking regional performance—this component gives users a whole new way to engage with CRM data visually.