
What is a Screen Flow in Salesforce?
A Screen Flow is a type of Flow in Salesforce that allows users to interact with a sequence of screens to input or view data. It’s designed for creating wizard-like experiences where users fill out forms across multiple steps. Think of it like building a mini app – all through clicks, not code.
🎯 Why Use Screen Flow?
Here are some reasons Salesforce Admins and Developers love Screen Flows:
- ✅ No Code Needed – All drag-and-drop
- ✅ Flexible UI – Create multiple screens, guide users step-by-step
- ✅ Data Collection – Perfect for forms like onboarding, surveys, support tickets
- ✅ Automation – You can use the input to create/update records, send emails, trigger other flows
- ✅ Reusable – Embed in Lightning Pages, Utility Bars, Quick Actions, or Communities
🔍 Real-Life Use Cases
- 📝 Collect feedback in multi-step forms
- 👨👩👧 Onboard new customers with guided input
- 🎫 Submit support tickets step-by-step
- 🏢 Create a new Lead or Contact with all necessary data in one flow
🧪 Use Case: Create New Contact Using 4-Step Screen Flow
Goal: We’ll build a flow where the user enters contact details step-by-step across 4 screens. When the final screen is submitted, a new Contact record is created in Salesforce.
🛠️ Step-by-Step: Building the Screen Flow
🧭 Step 1: Create a New Screen Flow
- Go to Setup → Flows
- Click New Flow
- Select Screen Flow → Click Create
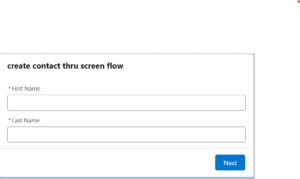
🖼️ Step 2: Screen 1 – Enter Name
- Drag a Screen element → Name it: Enter Name
- Add: Text → Label: First Name → API Name: firstName
- Add: Text → Label: Last Name → API Name: lastName
- Click Done
📱 Step 3: Screen 2 – Phone & Email
- Add another Screen → Name: Contact Info
- Add: Phone → Label: Phone → API Name: phone
- Add: Email → Label: Email → API Name: email
- Click Done
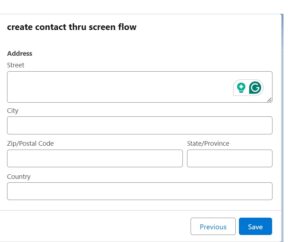
🏠 Step 4: Screen 3 – Address
- Add a Screen → Name: Address Info
- Add: Text → Label: Street → API Name: street
- Add: Text → Label: City → API Name: city
- Add: Text → Label: State → API Name: state
- Add: Text → Label: Postal Code → API Name: postalCode
- Click Done
📝 Step 5: Screen 4 – Description
- Add one more Screen → Name: Add Notes
- Add: Long Text Area → Label: Description → API Name: description
- Click Done
⚙️ Step 6: Create Record
- Add a Create Records element → Name: Create Contact
- Object: Contact
- Map the fields accordingly:
- FirstName → firstName, LastName → lastName, Phone → phone, Email → email
- MailingStreet → street, MailingCity → city, MailingState → state, MailingPostalCode → postalCode, Description → description
- Click Done
🔗 Step 7: Connect Flow Elements
- Start → Enter Name
- Enter Name → Contact Info
- Contact Info → Address Info
- Address Info → Add Notes
- Add Notes → Create Contact
💾 Step 8: Save and Activate
- Name: Create Contact Flow
- Click Save
- Then Activate
🎥 Want to Turn This into a Vlog?
Here’s a vlog outline if you’re planning to record this for YouTube or a learning platform:
🎬 Video Title: Create a Multi-Screen Contact Form in Salesforce | Screen Flow Tutorial
- 🧭 Chapters:
- What is Screen Flow?
- When & Why to Use It
- Live Demo – 4-Screen Contact Form
- Deploy & Test
- Tips and Best Practices
🔚 Final Thoughts
Screen Flows are one of the most powerful tools in the Salesforce Admin toolbox. Whether you’re onboarding users, capturing data, or building support tools – flows can make your app smarter and your users happier.
🚀 Next Steps
- Try adding validations (like required fields)
- Add a final confirmation screen
- Use decision elements for conditional logic